Introduction
This article will walk you through all the steps needed to cross compile Qt 5 code for the Raspberry Pi 3 using Linux. Once we have finished, you will be able to write code with Qt as you normally would, and then when you’re ready to build for the Pi, just select it as a build option and compile for the Pi!
The steps that we will cover are:
- Install Raspberry Pi OS (Buster) onto an SD card for the Raspberry Pi, and get it ready for development.
- Install all software and tools needed in a Linux Virtual Machine (VM).
- Create a sysroot folder in the Linux virtual machine, which we will use to synchronize the Qt libraries we will build onto the Pi.
- Build Qt from source, and any Qt modules we might need.
- Copy the Qt libraries over to the Pi.
- Build a Qt example, and deploy and run it on the Pi!
Quick links:
Synchronize the Pi and the Linux VM
Building and debugging with Qt Creator
Prerequisites
Before we start out, there are a few things that you are going to need:
- Raspberry Pi 3 and suitable 2.1A power supply
- 16 or 32GB micro SD card
- A computer with an SD card read or USB SD card reader - any OS will do
- Internet connection
- Ideally Ethernet network between Pi and and PC, WiFi will do but is slower
- Around 3 hours
- Linux VM to install Qt and the required software in - LUbuntu 18.04 alternate used here and recommended
Prepare the Raspberry Pi SD card
You will need to download the latest Raspberry Pi OS image from the Raspberry Pi website, available here: https://www.raspberrypi.org/downloads/raspberry-pi-os/
I recommend the medium sized image: “Raspberry Pi OS (32-bit) with desktop”. Direct download link: https://downloads.raspberrypi.org/raspios_armhf_latest
You will also need to download Balena Etcher to burn the image to the SD card, available here: https://www.balena.io/etcher/
Once you have the image downloaded, and Etcher installed, open Etcher, and open the Raspberry Pi image, and burn it to the SD card.
Open Etcher:

Click "Flash from file" and select the Raspberry Pi Image:

Click "Select target" and choose your SD card:

Click "Flash!" and wait for it to burn to the SD card:

Linux Virtual Machine
You will need a fresh Linux virtual machine for the development. If you already use Linux, you can install the tools and Qt on your normal machine, but I would recommend against this unless you are sure. If anything goes wrong with the installation, you can delete the Linux VM, and start again. Issues can also crop up due to conflicts with software you already have installed. For these reasons it is best to use a VM. I would recommend Ubuntu 18.04, or best LUbuntu 18.04, as it is lightweight and flexible. The “Alternate” download image is best, as it has the least extra software that won’t be needed, and saves some space and download time. It can be downloaded here: https://lubuntu.me/downloads/
Direct download of the image: https://cdimage.ubuntu.com/lubuntu/releases/18.04/release/lubuntu-18.04-alternate-amd64.iso
If you do not already have a virtual machine host installed, Oracle’s VirtualBox works well and is free, available here: https://www.virtualbox.org/wiki/Downloads
Once you have a virtual host installed, such as VirtualBox or VMWare’s player, and the LUbuntu image downloaded, create a new virtual machine with the following settings:
- 60GB virtual hard drive
- 8GB RAM
- As many virtual CPU cores as you can spare, but I would recommend no more than half the number as your PCs threads, i.e. if you have 8 threads (if you have an i7), 4 vCPU’s is a good choice. Make a note of how many vCPU's you allocated, it will be needed later.
Install LUbuntu using the installation menu. Once installed, open up a terminal by clicking on the bottom left menu icon > System Tools > LXTerminal.

Run the following command - note: each line is a separate command:
sudo apt update && sudo apt full-upgrade -y
You will be prompted for your user password, type it into the terminal and then press enter. Then run:
sudo apt install openssh-server net-tools -y
The following command installs the VM tools, needed if you are running in a virtual machine, with VMWare or VirtualBox:
sudo apt install open-vm-tools -y
Reboot the virtual machine. From this point on, it may be easier to SSH into the virtual machine for the rest of the commands, but this is not required. If you are able to copy and paste from your host machine into the virtual machine, you can skip this step. To SSH into the virtual machine, from Linux or MacOS, run the following command from a terminal:
ssh <VM username>@<VM IP address>
Follow the onscreen instructions
The IP address of the virtual machine can be found by running the command “ifconfig” from a terminal.

Raspberry Pi installation
Now that we have the Linux virtual machine ready, we can prepare the Raspberry Pi, although this can be done in parallel to installing the Linux VM to save time. Once the Raspberry Pi image has been burned to the SD card, put the SD card into the Raspberry Pi, connect it to a monitor, keyboard, mouse, and an Ethernet connection. Then connect the Pi to a suitable power supply. The official Raspberry Pi power supply is recommended for this.
On initial boot up, the Pi will resize the disk image to use the full SD card space, and so it may reboot, this is normal, just give it a few minutes. Once the Pi has booted up, you should see the following screen:
In the welcome window, click “Next”.

Select your country and timezone, and click “Next”.

Choose a password for your Pi. I used “pidev” as it’s easy to remember, and you will be typing it in a lot! Enter this password and click “Next”. Please use a secure password if this is for production or deployment!

If you see a black border around the monitor, check the tickbox and then click “Next”, otherwise just click “Next”.

If you are using WiFi, connect to your WiFi network. Note, you will need to be on the same network as the Linux VM, or rather the Linux VM has to be able to reach the Pi, and Pi needs to reach the Internet. Ethernet is definitely preferable, as there will be a lot of files to transfer. If you are using Ethernet, click “Skip”, otherwise connect and then click “Next”.

Click “Next” to update the software on the Pi.

Once the update has finished, it should say "Up to date", if not, there may be an issue with your internet connection.

Once done, click “Restart”.

Once the Pi has restarted, open the “Raspberry Pi Configuration” menu, by clicking on the Raspberry Pi icon in the top left, then “Preferences”, then “Raspberry Pi Configuration”. Click on the “Interfaces” tab, and click the “Enabled” radio button next the to the SSH line, and then click “OK”.

Make a note of the IP address of the Pi, by hovering over the network icon in the top left (WiFi symbol or two arrows if using Ethernet) [Pi IP image]. You now won’t need physical access to the Pi for a while.

Update and configure the Pi
Now that the Pi is setup, and SSH is enabled, SSH into the Raspberry Pi. This can be done from Linux or MacOS by running the following command from a terminal:
ssh pi@<PI IP address>
You may be connecting with SSH into the Pi quite a bit, so you may wish to enable key based login without a password. Todo this, run the following command to authorize you with the Pi:
ssh-copy-id pi@<PI IP address>
If you get the error that no hosts are found, run the following:
ssh-keygen
Then you can SSH into the Pi without typing out the password.
The first time you SSH into the Pi, you will be prompted to accept the host for security, type “yes” and then press enter.

You will then be prompted for the password for the Pi, enter the password and press enter.

Now you should be connected to the Pi via SSH. The prompt should change to say:
pi@raspberrypi

Now that we have remote access to the Pi, we need to enable the source repository for apt. To do this, run the following command:
[ Raspberry Pi ]
sudo nano /etc/apt/sources.list
Move the cursor to after the '#' on the third line, and use backspace to delete the '#', enabling the

Quit and save the changes, by pressing control + 'y'.

Confirm the file name by pressing enter.

Now we need to update following that change, by running the following command:
sudo apt update && sudo apt full-upgrade -y && sudo apt autoremove -y
Reboot the Pi, with: Note - if no updates were installed in the above step you can skip this reboot.
sudo reboot
Wait for the Pi to boot back up by SSHing back into the Pi (re run the following command or press up in your terminal and then enter.
ssh pi@<PI IP address>
We need to install various Qt and graphics libraries for building Qt code for the Pi.
Run the following commands:
[ Raspberry Pi ]
sudo apt build-dep qt4-x11 -y

sudo apt build-dep libqt5gui5 -y

sudo apt install -y libudev-dev libinput-dev libts-dev libxcb-xinerama0-dev libxcb-xinerama0

sudo mkdir /usr/local/qt5pi

sudo chown pi:pi /usr/local/qt5pi

sudo rpi-update
Press ‘y’ when prompted.
sudo reboot
Synchronize the Pi and the Linux VM
Now that the Pi has been updated, and had those libraries installed, we need to synchronize the Linux development VM with the Pi. We will be creating the directory "raspi" in the home directory to hold the development tools and the sysroot that will be created, to mirror files from the Pi.
First we need terminal access in the Linux VM. Either open a terminal in the VM or SSH into it if you prefer with the following: note to change the user and IP address
ssh <dev user>@<dev VM>
As before, you can enable key based authentication Todo this, run the following command to authorize you with the VMi:
ssh-copy-id <VM user>@<VM IP address>
If you get the error that no hosts are found, run the following:
ssh-keygen
Then you can SSH into the VM without typing out the password.
Once you have a shell (terminal or SSH) into the VM, we want to get the Raspberry Pi tools, create our sysroot, and synchronize it with the Pi.
[ Dev VM ]
sudo apt update && sudo apt full-upgrade -y && sudo apt autoremove -y

mkdir ~/raspi && cd ~/raspi

sudo apt install git python python3 -y

git clone https://github.com/raspberrypi/tools

mkdir sysroot sysroot/usr sysroot/opt
(Replace pi@<pi IP> with IP or local hostname)
export PI_IP=<pi IP>
ssh-keygen
(press enter when prompted - three times)
ssh-copy-id pi@$PI_IP
When prompted, enter "yes" then enter, and enter the password for the Pi.
rsync -avz pi@$PI_IP:/lib sysroot

rsync -avz pi@$PI_IP:/usr/include sysroot/usr

rsync -avz pi@$PI_IP:/usr/lib sysroot/usr

rsync -avz pi@$PI_IP:/opt/vc sysroot/opt
Note: If you didn't run ssh-copy-id, you will need to enter the Pi’s password for each command. There may be one or two errors, due to symbolic links and such, this won’t matter.
We need to get a script to fix some of the symbolic links to allow us to use the files we just copied across. Luckily there is a great script provided by Kukkimonsuta:
wget https://raw.githubusercontent.com/Kukkimonsuta/rpi-buildqt/master/scripts/utils/sysroot-relativelinks.py

chmod +x sysroot-relativelinks.py

./sysroot-relativelinks.py sysroot
Install Qt 5.12.3
Now we need to install Qt in the VM. We will be using 5.12.3. This is not the latest release, but I have found later releases do not work correctly. Check this space! I'll be updating this article or creating a new one with other versions of Qt that work. Before installing Qt, we need to install some libraries and utilities that will be used later. Run the following:
[ Dev VM ]
sudo apt install -y libgl1-mesa-dev libglu1-mesa-dev mesa-common-dev libxkbcommon-x11-0

sudo apt-get install -y lib32z1

sudo apt-get install -y libxcb-xinerama0-dev

sudo apt-get install -y flex bison gperf libicu-dev libxslt-dev ruby

sudo apt-get install -y libssl-dev libxcursor-dev libxcomposite-dev libxdamage-dev libxrandr-dev libfontconfig1-dev libcap-dev libxtst-dev libpulse-dev libudev-dev libpci-dev libnss3-dev libasound2-dev libxss-dev libegl1-mesa-dev gperf bison
Now we need to get the Qt installer. The easiest way is to use commands below, but you can go to their website and get it. Be sure to get the 5.12.3 version.
Download installer for Qt 5.12.3:
cd ~/Downloads

wget http://download.qt.io/official_releases/qt/5.12/5.12.3/qt-opensource-linux-x64-5.12.3.run

chmod +x qt-opensource-linux-x64-5.12.3.run
Note when you run the installer you will have to create an account and log in. Qt, if you're listening, this is bad! We just want to write code! Anyway... Go through the installer, and make sure you enable these exact options, you can add other modules if you want them.

Carry on through the installer. At the last page untick the option to launch Qt Creator now, we have more to do.
Go back to your shell into the VM, either with a terminal or SSH, and run the following to download the source code for Qt to build for the Pi, we're getting there!
[ Dev VM ]
cd ~/raspi

git clone git://code.qt.io/qt/qtbase.git -b 5.12.3
This may take a little while depending on your internet connection. Once done, we need to fix a broken mkspec for the Pi, annoying but straight forward. The easiest way is to just replace the file with the following. Or you can edit the file with nano, and make the changes yourself.
git clone https://github.com/LangtonsAnt/Qt5.12.3-RPi3-mkspec.git

cp Qt5.12.3-RPi3-mkspec/qmake.conf qtbase/mkspecs/devices/linux-rasp-pi3-g++/

cd qtbase
Now we're getting the fun stuff. The next command will configure Qt ready for building. It's a big old command, but don't worry. It will take around 5 - 10 minutes.
./configure -release -egl -opengl es2 -device linux-rasp-pi3-g++ -device-option CROSS_COMPILE=~/raspi/tools/arm-bcm2708/gcc-linaro-arm-linux-gnueabihf-raspbian-x64/bin/arm-linux-gnueabihf- -sysroot ~/raspi/sysroot -opensource -confirm-license -make libs -prefix /usr/local/qt5pi -extprefix ~/raspi/qt5pi -hostprefix ~/raspi/qt5 -v -no-use-gold-linker
Once it finishes, look at the output carefully. Make sure there are no errors. If there are, you can use the following the reset the qtbase directory:
git clean -dfx
Note this will keep the changes you made to the makespec.
Now we can build Qt! This will build qmake, and all needed libraries as binaries, for the Raspberry Pi! This could take a while based on your hardware...
sudo make -j<VM vCPU count>
We need to use sudo, because we're modifying files from the Pi. Now we need to install our newly built libraries into our sysroot for the Pi. Do that with the following:
sudo make install
Now to copy across those libraries to the Pi:
cd ..

rsync -avz qt5pi pi@$PI_IP:/usr/local
Now we need to let the Pi know about these new libraries. Open an SSH into the Pi, with:
ssh pi@<PI IP address>
[ Raspberry Pi ]
echo /usr/local/qt5pi/lib | sudo tee /etc/ld.so.conf.d/qt5pi.conf

sudo ldconfig
Build and run an example!
If all went well, we should now be able to build code for the Pi!
Let try out the analogue clock example included with Qt. Feel free to try any other example with the same method. Open a shell into the Linux development VM and run:
[ Dev VM ]
cd ~/Qt5.12.3/Examples/Qt-5.12.3/gui/analogclock/

~/raspi/qt5/bin/qmake

make -j<vCPU count>

scp analogclock pi@$PI_IP:~
On the Raspberry Pi, from the desktop open the home folder, and run the "analogcock" program, to check it works. If it did, congratulations! You can now cross compile for the Pi!
For certain programs, you may need extra modules. These are available here: https://code.qt.io/cgit/qt/
To build and include these modules in our sysroot, do the following, in this example QtSVG is used:
SSH into the development VM:
[ Dev VM ]
cd ~/raspi

git clone git://code.qt.io/qt/qtsvg.git -b 5.12.3

cd qtsvg

~/raspi/qt5/bin/qmake

sudo make -j<vCPU count>

sudo make install

cd ..

rsync -avz qt5pi pi@$PI_IP:/usr/local
Other modules can be used, just make sure to specify the 5.12.3 branch, with the -b flag to git. Once you have checked out, built, and installed the modules you want, copy them across to the Pi with the following:
rsync -avz qt5pi pi@$PI_IP:/usr/local
You may also need to refresh the list of libraries available on the Pi, by running the following from a shell into the Pi, with SSH for example:
[ Raspberry Pi ]
rsync -avz qt5pi pi@$PI_IP:/usr/local
Building and debugging with Qt Creator
Being able to build code and copy it across to the Pi with scp may be all you need, but if you're developing on the Pi you will want to add a kit in Qt to remotely upload compiled code to the Pi, and remotely debug!
First we need to install gdb-multiarch on the Linux VM, so we can debug the binaries. Run the following in the VM:
[ Dev VM ]
sudo apt install -y gdb-multiarch
Now we need the debug server to be running on the Raspberry Pi, install with:
[ Raspberry Pi ]
sudo apt install -y gdbserver
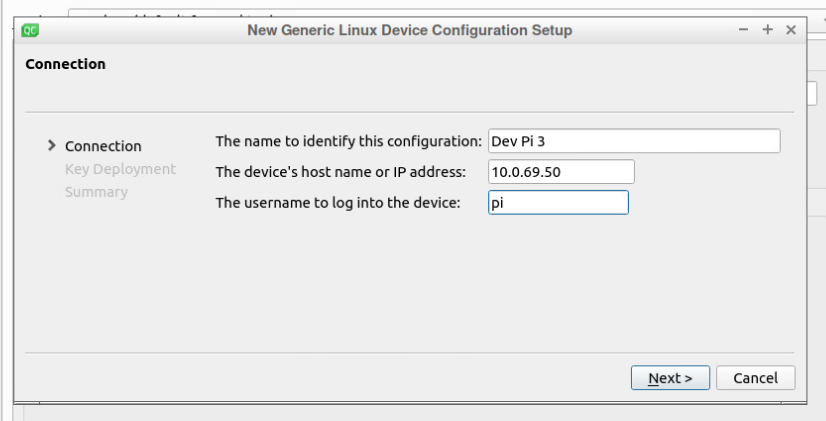
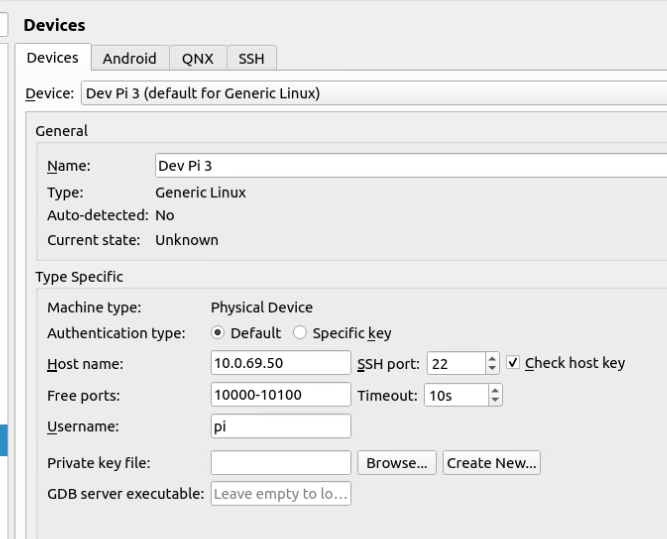
With those installed, now to configure Qt. Open Qt Creator, and open the options dialog, by clicking on "Tools" in the top menu, and then "Options...". Select "Devices" in the left side panel. Select the "Devices" tab, and click "Add...". Select "Generic Linux Device", and then click "Start Wizard".

Enter a descriptive name for your Pi, such as “Dev Pi 3". Enter the IP address of the Pi, and the username, usually "pi". Note, you will probably want to set your Pi to have a static IP address, or better yet, in your router issue a static DHCP lease and IP address for the Pi.
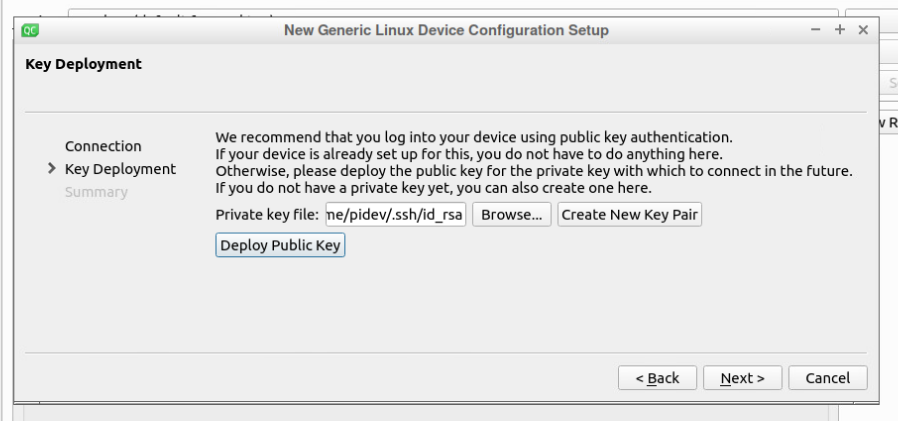
Your key should be automatically detected, if not select it with the "Browse..." button. If no key is detected, this is likely because one hasn't been generated. This can be solved by running ssh-keygen from a terminal, into the Linux VM. You may also need to run:
ssh-copy-id pi@<PI IP address>
Click "Next", and Qt will test the connection with your Pi.
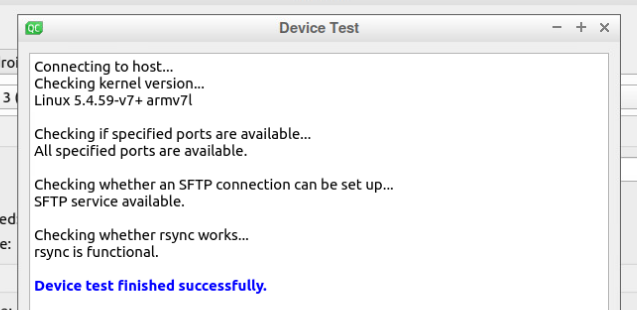
Now your device is configured, it should something like this.
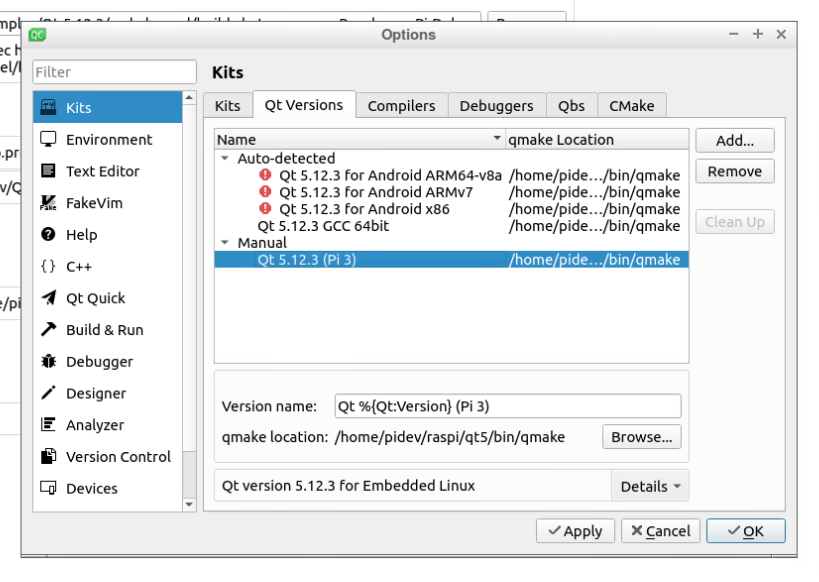
Now the device is configured, we need to set Qt Creator up with a kit. From the options windows, go to the "Kits" menu, in the left side bar. Select the "Qt Versions" tab, click “Add…”. Click the “Browse…” button below and navigate to:
/home/pidev/raspi/qt5/bin/qmake
Click "Apply" to save the changes. Next, go to the "Compilers" tab. Click “Add” GCC > C. Change the name to “Pi 3 GCC”. Click “Browse…”, navigate to:
/home/pidev/raspi/tools/arm-bcm2708/gcc-linaro-arm-linux-gnueabihf-raspbian-x64/bin/arm-linux-gnueabihf-gcc
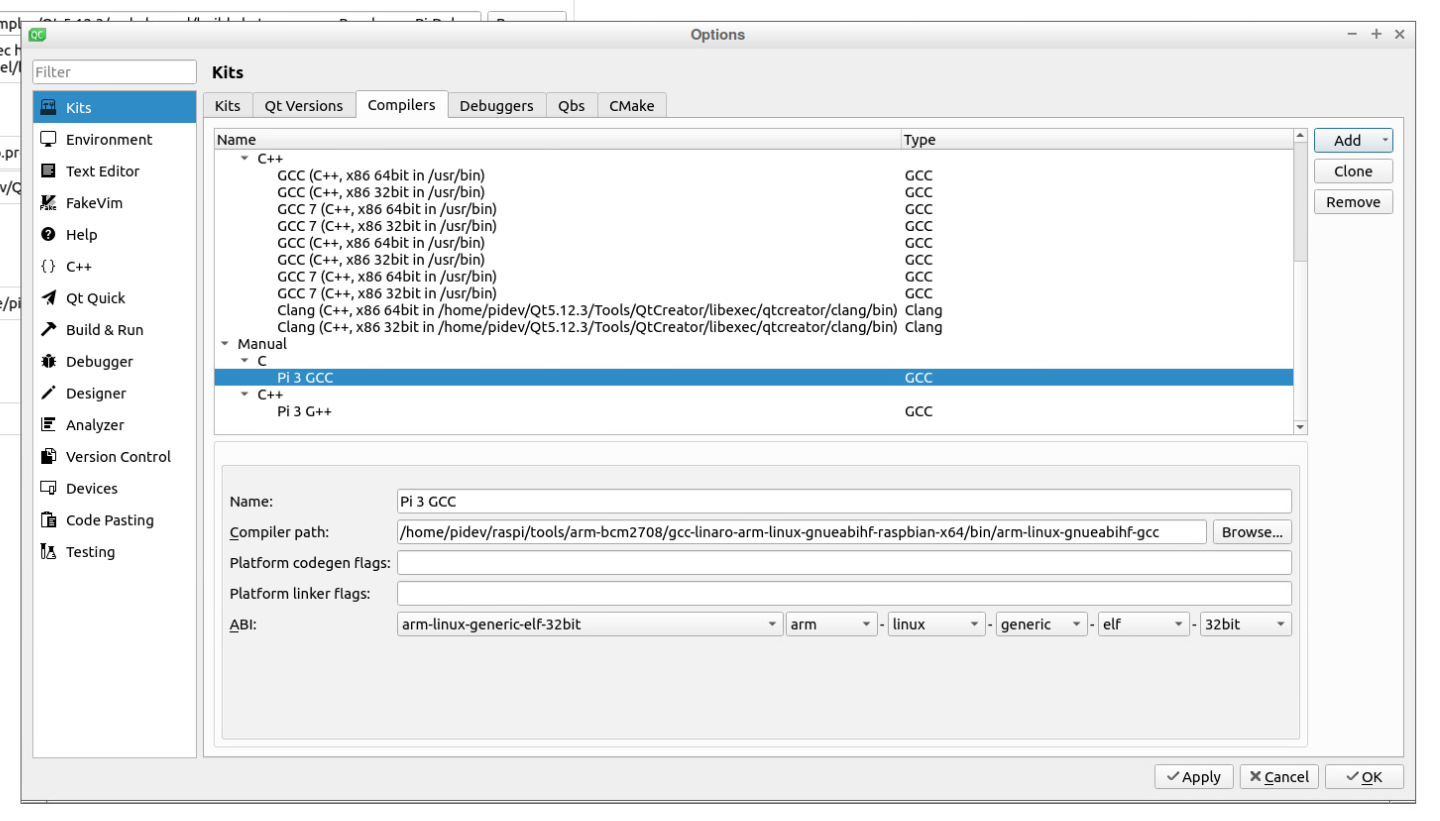
To add the C++ compiler: Click “Add” GCC > C++. Change the name to “Pi 3 GCC”. Click “Browse…”, navigate to:
/home/pidev/raspi/tools/arm-bcm2708/gcc-linaro-arm-linux-gnueabihf-raspbian-x64/bin/arm-linux-gnueabihf-g++
Click "Apply" to save the changes.

Now go to the Debuggers tab. Click "Add". Set the name to "GDB Multiarch". Click browse, and navigate to the following:
/usr/bin/gdb-multiarch
Click "Apply" to save the changes.

Finally to build the kit. Goto “Kits” tab. Click “Add”. Set the name something descriptive, such as: “RPi 3 Qt %{Qt::Version}”. %{Qt::Version} will print the selected Qt version. Set "Device Type" to "Generic Linux Device". Select the "Device" we created earlier. Set "Sysroot" to "/home/pidev/raspi/sysroot". For C and C++ compilers, choose the ones we created earlier. Set "Debugger" to "GBD Multiarch". Set the "Qt mkspec" to: "/home/pidev/raspi/qtbase/mkspecs/devices/linux-rasp-pi3-g++/". Note: you may have to change the username from "pidev". Once you have filled out the kit, click "OK".

First Qt project
Now to create our own example project and remotely debug it!
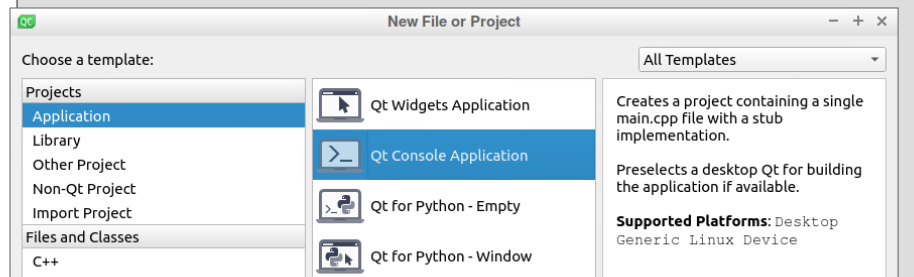
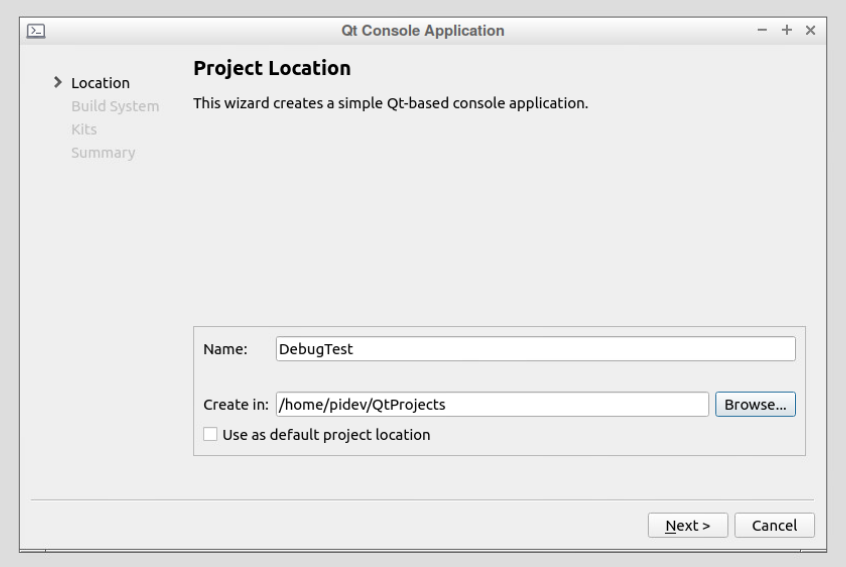
In Qt Creator, create a new project by pressing control + n or by going to the "File" menu (top left), then "New File or Project...". Select "Applications" under the "Projects", then "Qt Console Application", and click "Next".
Choose a name for the project, and a directory to create the project in. It might be best to create a directory, such as QtProjects.
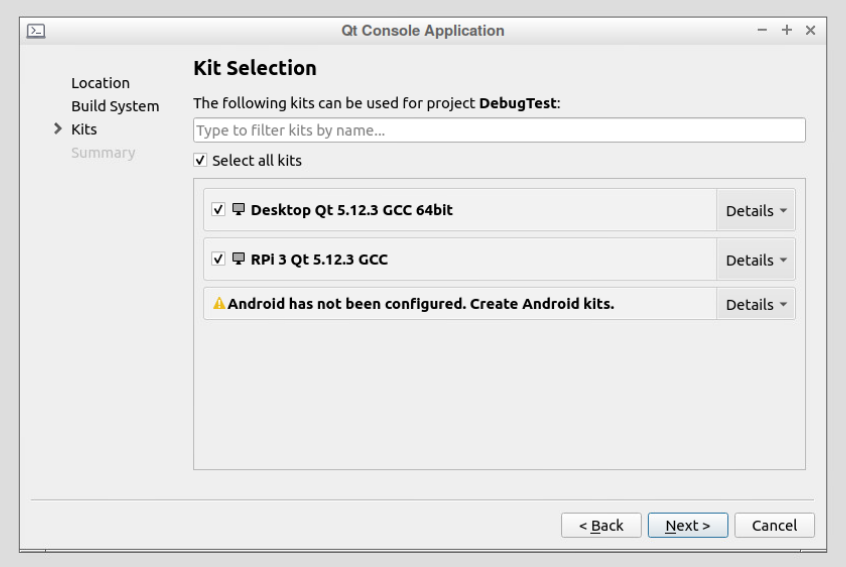
Select The Raspberry Pi kit we created earlier, and also the Desktop Kit, as this can be useful to troubleshoot.
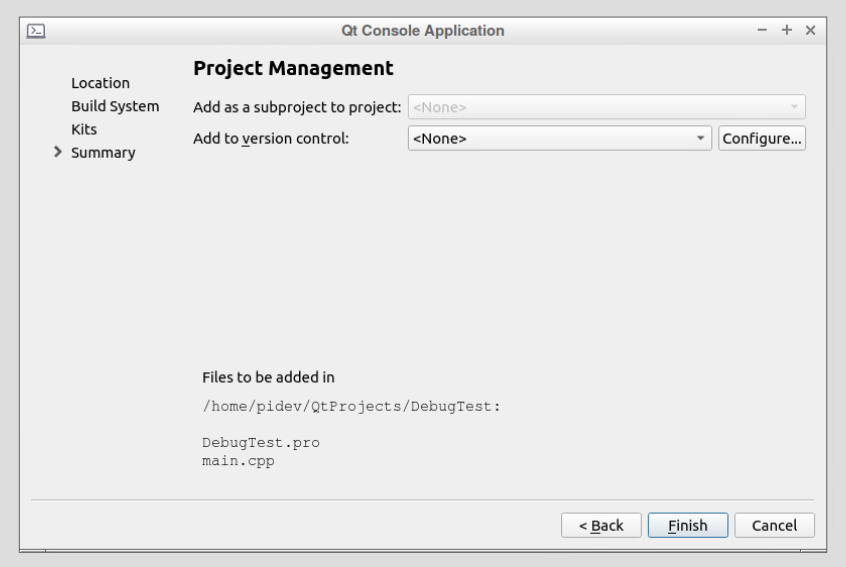
Click "Finish".
Now that the project is created, we need to make a change to the project file to specify where to upload the binary on the Pi. This is because the default location, /tmp, requires root privalages to upload to. We could SSH as root, but this is not advisable. I like to upload to a folder in the home directory or Desktop, making it easier to find from the Pi.
Open the .pro project file in the left bar by double clicking on it, and change the lines to match:
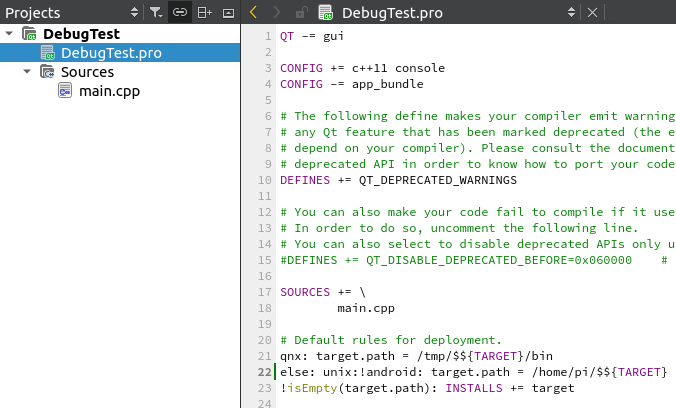
Save the changes by pressing control + s.
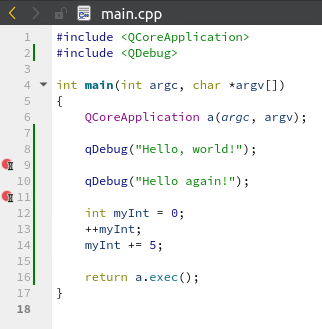
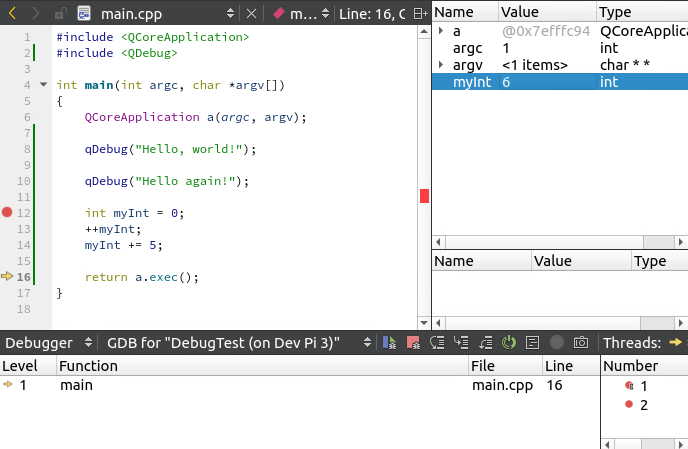
Now for some code to debug. Open main.cpp, highlight all the code and delete it (control + a, then backspace). Copy and paste the following code, or modify the code already there to match.
#include <QCoreApplication>

#include <QDebug>


int main(int argc, char *argv[])

{

 QCoreApplication a(argc, argv);


 qDebug("Hello, world!");


 qDebug("Hello again!");


 int myInt = 0;

 ++myInt;

 myInt += 5;


 return a.exec();

 }
Click to add a breakpoint in the left margin, while the line numbers are. Add a breakpoint between the two qDebug statements. This should leave a red circle on line 9 in the margin. Add another breakpoint on line 11, as below, just before declaring "myInt". This code will print out the text in the qDebug statements, and modify myInt. By using the debugger, we can single step through the code, and see "myInt" changing each step, with the code running remotely on the Pi!
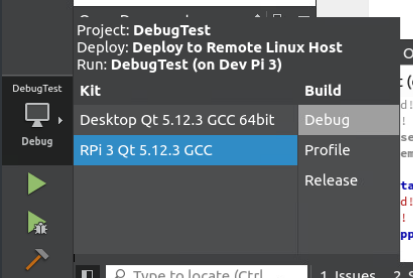
Now that we have our code and breakpoints, from the far left side bar, click on the PC icon, Select the Raspberry Pi kit, and the "debug" build option. This will enable building for the Pi, and enable the use of the debugger.
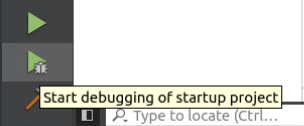
Click on the lower run button to start the debug session. This will build the code, and upload it to the Pi.
The code should run up to the first breakpoint, at which point it will break execution. The "Application Output" tab should show the first debug statement, "Hello, world!".
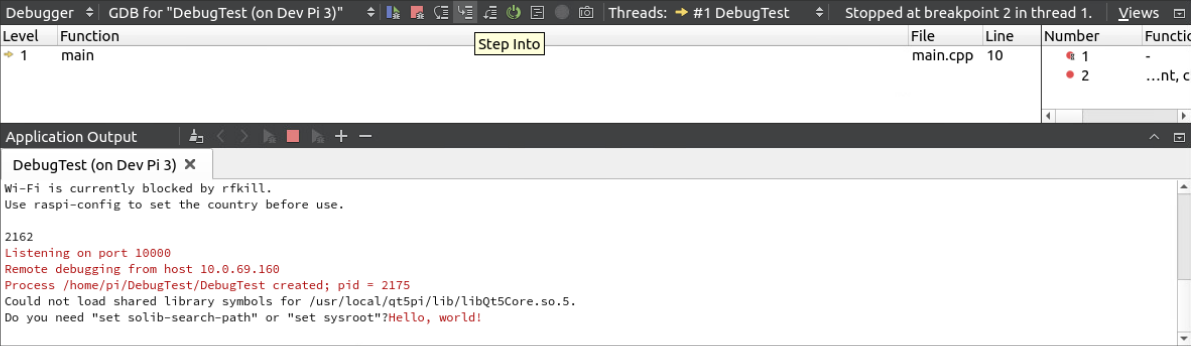
In the middle of the debug bar, click the "Step Into" button, until the next debug statement appears. If you keep pressing "Step Into", you will see the variable myInt changing in the right side bar, where variables can be inspected.
Congratulations! You can now remotely debug programs on the Pi, from your desktop!
If you had any issues please leave a comment below, and I will try to help, and update this guide. Happy programming!